
How To Do Belt Squats At Home
Belt squats are increasingly becoming popular as a lower body exercise in powerlifting, bodybuilding, and strength and conditioning. It is a great way of training the squat movement without loading on the spine. However, many gyms do not have access to a belt squat station.
So can you do belt squats without a machine or at home? Yes, you can do belt squats anywhere without a belt squat machine. One method requires feet elevation, a belt squat belt or dipping/pull up belt and a weight. The other method requires a belt squat belt or dipping/pull up belt, a Barbell Strap by Repel Bullies and a barbell.
In this article, we will go through why a belt squat is worth doing even if you are training at home, how to set it up easily and perform it perfectly without trouble.
Why Do Belt Squats
The belt squats is a great way to train the following muscles:
- Quadriceps
- Hip Abductors
- Hip Adductors
- Gluteus Maximus
There are 5 advantages of using a belt squat within a training programme:
- Replicate similar leg muscle activity to the back squat
- More carryover than a leg press for squats
- Avoiding loading the shoulders or upper body
- Reduce loading the spine
- Focus more on hip abductors to hip adductors
Replicate similar leg muscle activity to the back squat
Research has shown that the muscle activity between the belt squat and the back squat are very similar and there is negligible difference.
This makes the belt squat an easy substitute for the back squat if there needs to be planned or sudden change within the training programme.
The similarity in muscle activity between the two exercises means training the belt squat will have a very good carry over to increase the back squat for those who need it whether its for powerlifting, weightlifting or strength and conditioning.
More carryover than a leg press
There may be more carryover of strength for back squats with the belt squat, than compared to the traditioning 45 degree leg press.
The carry over comes from the similar positions you might be in during belt squats and that there is more hip extension movement. The belt squat almost allows you to fully push your hips through, although not as much as the back squat itself.
Avoiding loading the shoulders or upper body
The loading comes to loading around the lower back and hip area so the shoulders and upper body are not in demand during the belt squat exercise.
This may be useful if you are injured around the shoulders or upper body so you can continue to train the squat movement and substitute the back squat.
Reduce loading the spine
The belt squat loads the legs without loading the back as the weight does not lie across the shoulders or upper back.
This is great if you are looking to keep leg strength up after a back injury. If your back is a limiting factor for squats, you can use the belt squat to progress training for the legs.
Focus more on hip abductors to hip adductors
Research has suggested that the belt squat biases the hip abductor to hip adductor strength ratio. This will be beneficial for anyone looking to improve knee tracking over the feet.
This will be important if you are currently training to improve your squatting technique as a powerlifter, weightlifter or even bodybuilder. This will also be important for sport injury prevention as having the strength to be able to track your knees over your feet is associated with reduced ACL injuries.
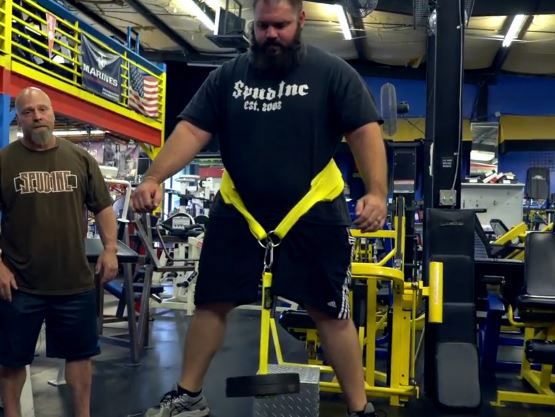
Two Ways To Do Belt Squats
There are two ways to do belt squats at home. Each of the methods will have their advantages and disadvantages. The method that is right for you will depend on what you have access to and your strength level. The two methods are:
- Method 1: The dumbbell/kettlebell method
- Method 2: The Barbell Strap method
Method 1
This first method or the single weight method will require the following equipment:
- A belt squat belt OR a dipping/pull up belt
- A pair of blocks/platforms for feet elevation
- A single weight e.g. kettlebell or weight plates
Step 1
First wrap the belt squat belt or dipping/pull up belt around the lower back and waist area.
Step 2
Attach your desired weight through your belt of choice. If it is a kettlebell, then thread the chain through the rings or if it is weight plates, then thread the chain through the hole of the plates.
Step 3
Secure the chain back onto the belt.
Step 4
Set up feet elevation with something that can handle the combination of your bodyweight and attached weights too. Sets of lifting blocks or some form of solid platform will be appropriate.
Ensure that the feet elevation is at a height that the weight reaches the floor at the bottom position of your squat range of motion.
Step 5
Stand up on the feet elevation and stand in the desired squat stance ready to execute the exercise.
Advantages
- Requires much less space as there is no need for a barbell or power rack
- Requires less equipment and does not need a barbell or other pieces of kit
Disadvantages
- Unsuitable for heavier weights as there will be difficulty with mounting on top of the feet elevation
- Weight hanging on the belt has freedom to swing a lot and is harder to stabilise
Method 2
This second method or the Barbell Strap method will require the following equipment:
- A belt squat belt OR a dipping/pull up belt
- Barbell Strap (Tension Buckle Version) by Repel Bullies
- A pair of blocks/platforms for feet elevation
- A barbell with weight
-
A power rack (optional)
Step 1
First strap the Barbell Strap by Repel Bullies onto the barbell and shorten the Barbell Strap as much as it can. We recommend the Tension Version of the Barbell Strap, as this allows the Strap to be set a lot shorter than the Chain Version
Step 2
Attach your desired weight onto the barbell.
Step 3
Wrap the belt squat belt OR dipping/pull up belt around your lower back and waist area. Squat down and thread the belt through the middle loop in the centre of the Barbell Strap.
Step 4
Adjust your stance to the desired squatting stance to get ready to stand up from the squat. Any barbell oscillations can be easily controlled by momentarily holding onto the barbell.
Optional. You may prefer to hold onto a power cage during the exercise.
Optional. You may prefer to stance onto feet elevation platforms to increase range of motion.
Advantages
- Allows greater loading onto the exercise due to the use of the Barbell Strap
- Very well balanced as the barbell does not swing much and can be controlled easily
Disadvantages
- Requires a bit more space and more equipment
Safety Consideration
The belt squat should ideally not be trained to failure regardless of what method is being used due to potential for difficulty of getting out of the equipment in such a situation.
Consideration
The belt squat exercise is a great lower body exercise that should not be left out from a training programme just because you do not have access to a belt squat machine station. Using these other alternative methods of executing it means you can continue to improve your muscle strength and size, whilst minimising loading on the upper body and spine.
References:
https://content.iospress.com/articles/isokinetics-and-exercise-science/ies570
Related Articles: